
LED Soffit Lighting: How Do You Plan the Layout?
Published 4-6-foot and 6-8-foot figures are vendor rules of thumb, not recommendations that apply to every product or building.
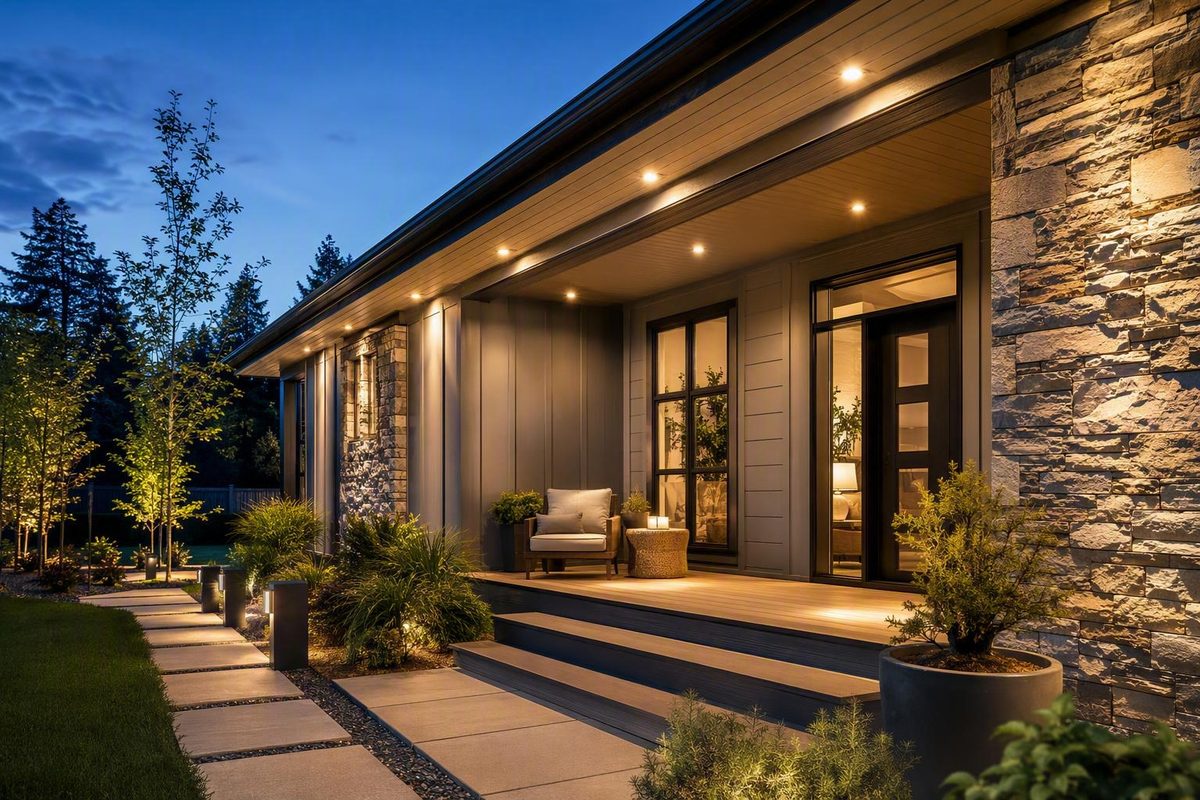
LED soffit lighting can provide restrained everyday illumination, emphasize stone or siding, light a porch or path, or turn a roofline into a programmable color display. Although all these effects may use fixtures mounted beneath an overhang, they require different optics, spacing, wiring, controls, and service strategies.
The reliable way to plan a system is not to begin with a fixture count. Start with the nighttime effect you want. Then choose a fixture format, evaluate its beam and white-light quality, verify the suitability of every exposed component, plan power and controls, test the proposed layout after dark, and preserve access for future repairs.
What LED soffit lighting is—and what it can realistically do
A soffit is the underside of a roof, eave, overhang, porch roof, or similar overhead surface. Exterior soffit lights are installed in or beneath that surface and normally direct light downward. The term can also describe interior lighting near the top of a wall or ceiling, but residential searches for LED soffit lighting usually concern exterior eaves and covered outdoor areas.
Soffit lighting differs from two related approaches:
- Uplighting starts near the ground or another low surface and aims upward. It is commonly used to emphasize trees, columns, masonry, or façade height.
- Cove lighting is generally concealed in a ledge or recess and directs light upward or onto an adjacent ceiling.
- Soffit downlighting begins overhead and directs light toward a wall, deck, path, entrance, or ground plane. Flexfire’s design overview distinguishes downward soffit lighting from upward cove lighting and identifies ambient, task, and wall-washing applications (Flexfire’s soffit-lighting guide).
Before comparing products, identify the primary job of the proposed lights.
Everyday ambient light should make a porch, deck, or building perimeter comfortable without dominating the view. This usually favors restrained output, broad distribution, dimming, and a dependable white-light mode.
Entrance and path visibility directs useful light toward doors, gates, walkways, steps, and driveway edges. Describe the goal as improved nighttime visibility, not as a guarantee that lighting will prevent crime.
Architectural accent lighting emphasizes columns, stone, textured siding, rooflines, or other selected surfaces. It generally requires tighter beam control and more deliberate placement than broad ambient illumination.
Task lighting over a grill, outdoor kitchen, workbench, or dining table must place useful light on a defined surface. Decorative perimeter lighting may not provide enough light where the task occurs.
Seasonal color lighting prioritizes programmable scenes, animation, zoning, and a concealed daytime appearance. Permanent RGB or RGBW systems have a different ownership model from conventional white downlights because they may depend on tracks, controllers, apps, and proprietary replacement components.
One layout rarely optimizes all five goals. Broad downlights may provide comfortable general visibility but flatten architectural texture. Narrow accent beams can produce dramatic wall patterns while leaving the surrounding deck dark. Closely spaced RGB pixels may animate smoothly in color yet remain obvious as separate points when set to white.
Write a one-sentence design brief before shopping. For example:
Provide warm, dimmable everyday light across the front porch, keep glare out of the upstairs windows, and add slightly stronger illumination at the entry.
That statement is more useful than “install eight soffit lights.” It defines the intended effect while leaving the fixture count open for testing.
Use this planning sequence:
- Define what the lighting must accomplish.
- Select a fixture format suited to that effect.
- Compare output, beam behavior, color, glare, and dimming.
- Verify the exposure suitability and instructions for every component.
- Plan power, wiring architecture, and controls.
- Mock up the layout and inspect it after dark.
- Keep fixtures, drivers, connectors, and controllers accessible.
Recessed, directional, strip, puck, or permanent RGBW: choose by effect
Fixture format affects much more than daytime appearance. It determines beam shape, cutouts, wiring access, heat-management needs, control options, and which components may eventually require replacement.
| Format | Typical effect | Suitable uses | Daytime visibility | Installation implications | Controls | Likely service points | Principal limitations |
|---|---|---|---|---|---|---|---|
| Recessed downlights | Discreet pools or overlapping areas of downward light | Porches, entrances, decks, perimeter lighting | Trim, lens, or a small fixture face remains visible | Requires a compatible housing or accurately sized opening; remote components must remain accessible | On/off, compatible dimming, timers, sensors, smart relays | Module, trim, seals, driver, junction | Fixed beams may create circles, gaps, or window glare |
| Adjustable or directional fixtures | Aimed accent or task beams | Sloped soffits, columns, masonry, entries, outdoor kitchens | Head, trim, or aiming mechanism may be visible | Requires repeatable alignment and room for adjustment | On/off, compatible dimming, grouped zones | Fixture, aiming mechanism, module, driver | Poor aiming creates glare, spill, or inconsistent patterns |
| Linear LED strips | Continuous-looking line | Modern façades, long eaves, indirect deck lighting | Channel and diffuser may be visible | Needs straight channel alignment, diffusion, suitable sealing, thermal management, and planned joints | Dimming, tunable white, RGB, RGBW, scenes | Strip sections, cut ends, joints, driver, diffuser | Visible dots, crooked lines, failed joints, voltage drop |
| Puck lights | Compact, localized points | Small bays, niches, posts, deck features | Small discs or apertures remain visible | Requires repeatable openings and an approved cable arrangement | On/off, dimming, system-specific zoning | Puck, connection, driver | Focused output may not provide uniform general coverage |
| Permanent RGB or RGBW track | Repeating points with scenes and animation | Holidays, game-day colors, roofline effects, programmable daily lighting | Track color and pixel spacing affect concealment | Requires track mounting, controller and power-supply locations, and data/power planning | App, schedules, zones, presets, remote or shared control | Pixels, track, connectors, controller, power supplies | Proprietary parts, app dependence, pixelated white, complex repairs |
Recessed downlights
Recessed fixtures produce a low-profile downlight with the body and electrical components substantially concealed above the soffit. “Recessed” does not mean invisible: a trim, lens, or fixture face normally remains visible from below.
A retrofit module is intended for a compatible existing recessed housing. A canless fixture is used where no housing exists and normally requires a new opening plus an accessible electrical connection or remote driver. Do not infer compatibility from nominal diameter alone. Verify the housing type, cutout, connector, depth, product labeling, and instructions for the exact model.
Recessed lights suit discreet general illumination when their beams overlap appropriately. They can also produce deliberate façade scallops, but that effect should result from intentional placement rather than an arbitrary spacing rule.
Adjustable and directional fixtures
A gimbal, tiltable downlight, or directional spotlight can compensate for a sloped soffit and aim light toward a wall, column, doorway, or work surface. A soffit-light retailer also describes tiltable models for inclined soffits and for directing beams away from windows (Soffit-Light’s fixture overview).
Adjustment is not an automatic cure for glare. Moving a beam away from one window may increase spill toward a neighboring property or expose the source from another viewpoint. Aim each fixture at night, then check it from indoors, from the street, and from adjacent outdoor areas.
Linear LED strips
Strip lighting can create a continuous-looking line rather than a sequence of circular pools. The result depends on the complete assembly: strip density, channel depth, diffuser, mounting distance, straightness, surrounding surfaces, driver behavior, joints, and sealing.
Do not plan an exterior strip system around exposed adhesive strip alone. The strip, channel, diffuser, cut ends, connectors, cable entries, driver, and enclosure must each suit their location.
Long runs also require power-distribution planning. Resolve that through the manufacturer’s approved cable, branch, and power-injection design—not by assuming that a higher-wattage supply will force consistent voltage to the far end.
Puck lights
Pucks are compact, disc-like sources that provide localized illumination. They can work above a feature, within a small bay, or as repeating points beneath a covered deck.
Their small size does not guarantee uniform coverage. Request lumen and beam information, then test the selected puck at the intended mounting height.
Permanent RGB and RGBW tracks
RGBW adds a dedicated white channel, potentially making the system more useful for everyday architectural lighting.
Color temperature, color rendering, consistency between pixels, dimming behavior, and flicker remain product-specific.
Permanent systems also raise ownership questions:
- Does the track blend into the soffit during the day?
- Are the cables concealed?
- Where will the controller and power supplies remain accessible?
- Can failed pixels or track sections be replaced?
- Can schedules run without internet access?
- What happens if the app, cloud service, or controller is discontinued?
- Can multiple household members control the system?
- What state returns after a power interruption?
As one vendor-specific example, ShowHome describes an RGBW kit containing color-matched track, weather-sealed wiring, power supplies, connectors, a controller, and app-based zones and schedules. These are claims about that system, not capabilities shared by every permanent-lighting product (ShowHome’s permanent-lighting overview).
Use this decision tree:
- Choose recessed downlights for discreet general downward illumination.
- Choose directional fixtures for sloped soffits, accents, or targeted tasks.
- Choose linear strip for a continuous line of light.
- Choose pucks for compact, localized illumination.
- Choose RGBW track when programmable color is a primary requirement and you accept the associated controller, software, and replacement-parts ecosystem.
Choose brightness, beam, color, and glare control before choosing spacing
Wattage is electrical input, not a complete measure of useful brightness or coverage.
Ask for these specifications before deciding how many fixtures to buy:
- Delivered lumens
- Beam angle or distribution
- Mounting-height or spacing guidance for that model
- Photometric diagrams or files, where available
- Color temperature
- Color Rendering Index
- Dimming method and range
- Flicker information
- Color consistency between fixtures
- Operating-temperature range
A wider beam generally distributes light across a broader area at a lower concentration. A narrow beam concentrates light in a smaller area. Neither is inherently better: broad distribution may suit a porch, while a narrow beam may reveal masonry texture or isolate a column.
Coverage changes with mounting height, but height is only one variable.
Common visual problems include:
- Isolated bright circles: optics are too concentrated for the intended effect or adjacent beams do not overlap sufficiently.
- Dark gaps: beams do not meet on the target surface or output is inadequate.
- Wall scallops: repeated arcs appear where fixtures sit near a vertical surface. Uniform scallops can be attractive when intentional.
- Glare through windows: the source or a bright reflection is visible indoors.
- Reflections on glass: a fixture aimed away from a window may still reflect from its exterior surface.
- Visible strip diodes: channel depth, diffusion, LED density, or viewing distance does not blend the individual points.
- Spill toward neighbors: light extends beyond the intended façade or property.
- Repeated shadows: excessive fixture density lights objects from several directions.
Possible corrections include lowering output, dimming, changing the beam, increasing diffusion, adding compatible shielding, selecting an adjustable fixture, revising the wall setback, or moving fixture centers. Any change must remain compatible with the product.
White-light and color options
Vendor guidance commonly describes 2700K–3000K as warm and residential in appearance, while 4000K–5000K appears cooler and crisper. These are appearance categories, not universal prescriptions; surrounding materials, output, optics, and nearby light sources affect the result (TruScapes’ soffit-lighting overview).
The principal color choices are:
- Static white: one fixed color temperature; simple and predictable.
- Selectable CCT: one of several white settings is selected during installation or setup.
- Tunable white: the user can adjust white appearance across the product’s supported range.
- RGB: colored channels combine to create decorative colors and an approximate white.
- RGBW: colored channels plus a dedicated white channel.
Even when decorative color is important, establish an acceptable everyday white scene. Test it separately from saturated colors. A roofline that looks impressive in red or green may look uneven or distinctly pixelated in ordinary white.
CRI helps compare how materials and finishes appear under a light source, but the available evidence does not provide a defensible threshold for ranking soffit products. Treat flicker, dimming range, and fixture-to-fixture color consistency similarly: request documented specifications and observe samples where possible.
Nighttime evaluation checklist
Before final installation, inspect the mock-up from:
- The street and driveway
- The front walk and entry
- Deck steps, edges, and work surfaces
- Ground-floor and upstairs windows
- Bedrooms with interior lights both on and off
- Adjacent properties and shared paths
- The façade, columns, or materials being accented
- Directly beneath the fixtures
- Normal seated positions on a porch or deck
Test at full output and at the intended everyday dimmed level.
How to plan fixture quantity and spacing without relying on a universal rule
There is no defensible universal spacing distance for LED soffit lighting. One vendor article suggests 4–6 feet as a rule of thumb for recessed deck lights (TruScapes); another gives 6–8 feet while acknowledging that eave height and fixture intensity affect spacing (DEKOR’s layout guidance).
Neither range has enough project-specific photometric support to become a general recommendation. Do not transfer either figure automatically to another fixture or building.
Build the layout from the selected product’s information and the actual structure:
| Input | Project note |
|---|---|
| Illuminated run length | Measure only the area intended to receive light |
| Soffit height | Record changes along porches, steps, and rooflines |
| Fixture lumens | Use documented delivered output where available |
| Beam distribution | Note whether fixed, asymmetric, or adjustable |
| Wall setback | Measure fixture center to façade or target wall |
| Soffit slope | Record flat and angled sections separately |
| Target surface | Wall, path, deck, doorway, column, or worktop |
| Surface color and texture | Light siding, dark brick, stone, timber, or paving |
| Desired overlap | General wash, separated pools, or deliberate scallops |
| Windows and doors | Mark glass, sightlines, and entry emphasis |
| Corners and transitions | Identify inside corners, outside corners, and roof changes |
| Vents and obstructions | Map unavailable mounting zones |
| Service access | Identify where drivers and connectors can be reached |
Begin with the manufacturer’s photometric diagrams, spacing tables, or mounting guidance when available. Do not copy a dimension from a fixture with different lumens, optics, or mounting height.
Use this non-prescriptive method:
- Draw the intended illuminated run to scale.
- Divide it into functional zones such as entry, façade, corner, seating area, and path.
- Mark candidate centers that look orderly in daylight.
- Move centers away from vents, obstructions, inaccessible cavities, and problematic window sightlines.
- Temporarily position the selected fixture, a sample, or a representative mock-up.
- Observe overlap, glare, reflections, and shadows after dark.
- Revise the centers and proposed count before cutting.
- Repeat the test at the expected dimmed setting.
A simple count worksheet is more useful than an unsupported formula:
| Zone | Run length | Temporary centers | Observed problem | Revision |
|---|---|---|---|---|
| Entry | Door too dark or source visible | |||
| Main façade | Gaps, scallops, excessive brightness | |||
| Corner | Overlap or double brightness | |||
| Deck or porch | Shadows or glare at seating | |||
| Path or steps | Poor visibility at transitions |
The revised number of temporary centers becomes the proposed fixture count. It is not final until the chosen optics have been evaluated under realistic conditions.
More fixtures are not automatically better. Too few fixtures can leave dark gaps or require each light to operate at an uncomfortable output.
Treat these areas separately:
- Corners: fixtures on perpendicular runs may create a bright overlap.
- Entryways: the door, lock, steps, and visitor’s face may need more useful light than the surrounding perimeter.
- Steps: illuminate changes in level without placing an exposed source in the normal line of sight.
- Angled soffits: evaluate where the beam lands instead of aligning fixtures only by trim position.
- Windows: move, aim, shield, or reduce output where indoor glare appears.
- Long façades: alignment errors become conspicuous, but mechanically uniform spacing may still look wrong where the architecture is not uniform.
Outdoor ratings: verify the fixture, driver, connector, and enclosure separately
“Under a soffit” does not describe one exposure condition. A fixture beneath a deep porch may encounter humidity and condensation but little direct rain. A shallow open eave may receive wind-driven rain. Coastal air, insects, debris, attic heat, and winter cold create additional variables.
Within the available evidence, vendor guidance differs on whether exterior soffit products should generally be damp- or wet-location rated. That disagreement is a reason not to prescribe one label for every installation. Determine suitability from actual exposure, the selected product’s documentation, and applicable local requirements.
Do not treat it as proof that the entire installation is suitable, that every connected component has the same protection, or that local electrical requirements have been satisfied.
Verify each relevant part separately:
- Fixture face and lens
- Fixture body above the soffit
- Gaskets and seals
- Remote driver or power supply
- Strip and channel
- Cut ends and end caps
- Connectors and cable splices
- Cable-entry points
- Junctions and enclosures
- Track and mounting hardware
- Controller and receiver enclosure
NuWatt, for example, broadly recommends wet-rated exterior recessed fixtures, but that is vendor guidance rather than a universal ruling for every protected soffit (NuWatt’s recessed soffit guide).
Do not extend one product’s claim to the rest of the system. Likewise, wording such as “waterproof,” “weather-sealed,” “UL,” “ETL,” or “CE” should prompt verification of the exact component, configuration, and scope being described.
Strip systems require particular attention at discontinuities. Treat every cut end, corner, joint, connector, and cable entry as a separate point to inspect.
Ask these environmental questions before buying:
- Can wind-driven rain reach the light or the cavity above it?
- Can water follow a cable into a connector or enclosure?
- Is salt air or another corrosive atmosphere present?
- Where can condensation collect, and how is the assembly intended to handle it?
- Will the driver experience attic heat or winter cold?
- Is the documented operating-temperature range appropriate?
- Are insects likely to enter an open cavity?
- Are replacement seals, end caps, and connectors available?
- Does the product documentation cover the intended mounting orientation?
- Do the instructions permit installation in the actual soffit assembly?
Product documentation and applicable local requirements should determine suitability. The evidence does not support one universal IP number or damp/wet label for every soffit installation.
Pre-installation checks: soffit material, vents, access, and cutouts
The last useful time to discover an obstruction is before drilling. Inspect the full route above and below the soffit, not only the visible panel.
Pre-cut inspection checklist
- [ ] Identify the soffit material and panel construction.
- [ ] Obtain the exact fixture model and documented cutout template.
- [ ] Confirm the available depth above every proposed center.
- [ ] Locate framing, blocking, roofing components, pipes, ducts, and other obstructions.
- [ ] Identify insulation and product-specific clearance instructions.
- [ ] Map intake vents and ventilation openings.
- [ ] Confirm attic or panel access for routing and future repairs.
- [ ] Plan the wiring route before finalizing fixture centers.
- [ ] Select an accessible location for drivers, power supplies, controllers, and junctions.
- [ ] Check the manufacturer’s required spacing from other building components.
- [ ] Verify whether the fixture is retrofit or canless.
- [ ] Confirm how the fixture is retained in the soffit material.
- [ ] Determine how cables and components are intended to be secured.
- [ ] Review sealing and drainage instructions.
- [ ] Confirm that fixtures, drivers, and connectors can be replaced later.
Treat soffit ventilation as a primary layout constraint. Map vents before placing fixtures, cable routes, drivers, or track. Thunder Lighting Supply’s installation guide specifically identifies soffit material, clearance, attic access, vents, wiring access, transformer placement, and specification-matched openings as pre-installation checks (Thunder Lighting Supply’s installer guide).
Material behavior also affects preparation. NuWatt’s vendor guide cautions that thin aluminum can warp during installation, vinyl can crack under pressure, and exterior wood should be treated for outdoor exposure. Use those points as reasons to follow methods suited to the particular material and fixture—not as a universal cutting procedure (NuWatt’s material guidance).
Match the hole saw or template to the manufacturer’s documented cutout, not the nominal diameter of the visible trim.
Retrofit modules and canless fixtures require different preparation. A retrofit product depends on a compatible existing housing and connection. A canless fixture needs a new opening and an accessible approved electrical connection, often involving a remote driver or junction component.
Keep the installation sequence conceptual:
- Inspect the building assembly and available access.
- Lay out and mock up fixture positions.
- Isolate the applicable power as required for the work.
- Cut only to the selected product’s specification.
- Route and secure wiring using the approved system for that product and location.
- Make connections suitable for the equipment and exposure.
- Seat and seal components as directed.
- Test operation before closing areas that will become difficult to reach.
This is not a substitute for product-specific or jurisdiction-specific electrical instructions. Conductor sizing, grounding, boxes, circuit protection, cable methods, and branch-circuit details depend on the selected equipment and local requirements.
Work at height, fragile panels, cramped attics, uncertain wiring, and inaccessible connection points are reasons to use an appropriately qualified installer. Before making the first opening, ask:
Can the fixture, driver, connector, and controller be reached and replaced without dismantling a large section of the soffit?
Power, controls, and the boundary between DIY and electrical work
First determine whether the proposed system uses line-voltage fixtures, low-voltage fixtures supplied by a driver, or a packaged arrangement with line-voltage input and low-voltage output.
For a low-voltage system, collect these planning inputs:
- Total connected fixture or strip wattage
- Required operating voltage
- Compatible driver or power-supply capacity
- Documented derating conditions
- Cable length and route
- Expected voltage drop
- Number and length of branches
- Controller capacity per channel and in total
- Permitted daisy-chain or branch arrangement
- Manufacturer-approved power-injection locations
- Ambient temperature around the power supply
- Standby load of connected controls, if documented
Some suppliers advise selecting a power supply with 20–30% headroom over connected load. That figure is supplier guidance, not a universal electrical requirement. Product instructions, load type, ambient-temperature derating, and controller limits still govern (Thunder Lighting Supply’s power-planning guidance).
Cable design, connection quality, branch arrangement, run length, load distribution, and manufacturer-approved injection methods may all affect the result.
Follow the selected system’s diagram for permitted branches, daisy chains, polarity, data direction, and injection points.
Control choices
Available controls may include:
- Compatible wall dimmers
- Timers
- Motion sensors
- Dusk-to-dawn or photocell operation
- Smart relays
- App schedules
- Zones
- Saved presets
- Tunable-white controls
- RGB or RGBW scene controllers
- Remote access
- Shared household or property-manager access
Compare compatibility and fallback behavior, not just the feature list:
- Which dimming method does the fixture or driver support?
- Is there a documented minimum load?
- What is the usable dimming range?
- Does the controller support the total and per-channel load?
- Is there a dedicated white-light channel?
- Can schedules operate locally without internet access?
- Does basic on/off control remain available if the app is unavailable?
- Is an account or cloud connection required?
- Can more than one user administer the system?
- What state returns after a power interruption?
- Can architectural zones operate independently?
- Are replacement controllers backward-compatible?
Use a conservative DIY boundary. Layout, product comparison, nighttime mock-ups, and some manufacturer-approved low-voltage plug-in assembly may be approachable for readers with suitable tools, access, and skills. Panel work and uncertain line-voltage work belong to an electrician. Permits, difficult access, unfamiliar wiring, and uncertainty about local requirements are additional reasons to seek professional help.
LED Lighting Zone’s own published scope similarly describes its articles as informational, focuses them on low-voltage LED systems, and directs panel work to an electrician. That is the publisher’s stated boundary, not a substitute for local licensing rules (LED Lighting Zone’s electrical-work notice).
Compare complete cost, serviceability, and ownership—not just fixture price
Fixture price is only one part of a soffit-lighting budget. An inexpensive light may require separate drivers, channels, connectors, enclosures, access equipment, or difficult labor. A more expensive kit may include those components while creating long-term dependence on proprietary controls.
Use a complete-project worksheet:
| Cost category | Quantity or assumption | Product or quote | Extended cost |
|---|---|---|---|
| Recessed fixtures, pucks, or strip | |||
| Track or aluminum channel | |||
| Diffusers and end caps | |||
| Drivers or power supplies | |||
| Controllers, receivers, or gateways | |||
| Cable and approved connectors | |||
| Weather-suitable junctions or enclosures | |||
| Mounting and sealing hardware | |||
| Access equipment or scaffolding | |||
| Permits and inspections | |||
| Installation labor | |||
| Soffit repair or finish work | |||
| Spare fixtures, seals, and connectors | |||
| Commissioning or app setup | |||
| Future service allowance |
The available per-light and system estimates are too poorly defined to serve as reliable market benchmarks. They mix or omit location, labor rates, access difficulty, fixture count, controls, electrical work, permits, and finish repair.
A dated vendor price can illustrate why fixture cost is incomplete, but it is not a market average. In the supplied DEKOR listing checked for this guide on August 15, 2026, a dedicated 12 VDC soffit light was displayed at $32.52 USD. The price, configuration, and inventory may change, and the figure excludes the rest of the system (DEKOR’s soffit-lighting collection).
Operating cost cannot be estimated from “energy-efficient” wording or one fixture’s wattage. A meaningful estimate needs:
- Wattage per fixture or strip length
- Fixture count
- Driver losses
- Average dimmed load
- Daily and seasonal runtime
- Controller standby consumption, where documented
- Local electricity rate
State those assumptions explicitly when comparing annual costs.
Serviceability checklist
A system that works on installation day can still become expensive if routine failures require extensive removal work.
- [ ] Are remote drivers accessible?
- [ ] Can an LED module or individual fixture be replaced?
- [ ] Are replacement seals, gaskets, end caps, and connectors available?
- [ ] Are track dimensions proprietary?
- [ ] Can one failed strip section be removed without disturbing the full run?
- [ ] Is the controller based on a standard or vendor-specific interface?
- [ ] Is offline operation available?
- [ ] Does the system depend on continuing app or cloud support?
- [ ] Are spare parts stocked in the project’s country?
- [ ] What lead time does the supplier quote for replacement parts?
- [ ] Can a future technician obtain wiring diagrams?
- [ ] How much soffit must be removed to reach each service point?
- [ ] Can unaffected sections continue operating after one component fails?
Think in terms of separate failure domains: LED module, driver, seal, connector, cable, controller, app, cloud service, and track. A long LED warranty does not resolve every one of them.
Warranty length also does not establish lifecycle value. Read the terms for outdoor-use conditions, required installation methods, labor, removal and reinstallation, shipping, commercial use, power supplies, controllers, finish coverage, and exclusions related to installation or environmental conditions.
Quote-comparison table
Ask every bidder or supplier to complete the same fields:
| Comparison field | Quote A | Quote B | Quote C |
|---|---|---|---|
| Manufacturer and model | |||
| System voltage | |||
| Lumens per fixture or length | |||
| Beam angle or photometric data | |||
| CCT or tunable range | |||
| CRI | |||
| Dimming method and range | |||
| Fixture exposure rating | |||
| Driver and connector ratings | |||
| Certification or listing scope | |||
| Operating-temperature range | |||
| Required cutout and depth | |||
| Driver and junction location | |||
| Control features and offline behavior | |||
| App or cloud dependency | |||
| Warranty coverage and exclusions | |||
| Replacement-parts availability | |||
| Permits and inspection included | |||
| Soffit repair included | |||
| Complete installed price |
Before purchasing, ask:
- Does the system create the intended everyday nighttime effect?
- Is each component suitable for its actual exposure and temperature?
- Can likely failure points be reached and repaired?
- Does the complete project—not merely the fixtures—fit the budget?
The available evidence is insufficient to name a best LED soffit light or rank brands by durability. Compare documented systems intended for defined conditions instead.
Frequently asked questions
How far apart should LED soffit lights be?
There is no universal spacing. Distance depends on fixture lumens, beam distribution, mounting height, wall setback, soffit slope, target surface, desired overlap, and acceptable glare.
Start with product-specific photometric or spacing information. Mark temporary centers, mock up the selected fixture at the actual height, and inspect it after dark before cutting. Published 4–6-foot and 6–8-foot figures are vendor rules of thumb, not recommendations that apply to every product or building.
Should exterior soffit lights be wet-rated or damp-rated?
It depends on actual exposure, product documentation, and applicable local requirements. A deep protected porch is not exposed in the same way as a shallow eave receiving wind-driven rain.
Verify the fixture face, body, driver, connectors, track, controller, and junction separately. Do not assume one component’s IP claim or location rating covers the complete installation.
Are recessed lights or LED strips better for soffits?
Neither is universally better.
Choose recessed lights for discreet downward illumination, conventional control options, or repeated pools of light. Choose strip lighting for a continuous linear effect when you can provide straight channel alignment, diffusion, suitable joints, appropriate heat management, and accessible drivers.
If the decision is primarily aesthetic, mock up both. A rendering cannot fully reveal wall scallops, visible diode points, reflections, or glare.
Can I install LED soffit lighting myself?
Layout work, mock-ups, component comparison, and some manufacturer-approved plug-in low-voltage assembly may be suitable for a capable DIY user.
Use an appropriately qualified electrician or installer for panel work, uncertain line-voltage work, unfamiliar wiring, permit-dependent work, difficult attic access, or unsafe work at height. Follow the selected product’s diagrams and local requirements rather than generic wiring instructions.
What color temperature works well for residential soffit lighting?
Vendor guidance commonly describes 2700K–3000K as warm and residential, while 4000K–5000K appears cooler and crisper. These are appearance ranges, not universal design thresholds.
Test a sample against the home’s siding, masonry, landscaping, and indoor light visible through windows. For RGBW or tunable-white systems, create a restrained everyday white preset instead of judging the product only by its decorative colors.
Plan the effect first and keep the system repairable
Successful LED soffit lighting does not come from selecting the greatest number of fixtures or the longest advertised warranty. Decide what the light must accomplish, compare fixture formats by beam and ownership model, verify every exposed component, and map vents, obstructions, wiring routes, and access points.
Then mock up the layout after dark, obtain product-specific electrical documentation, and keep fixtures, drivers, connectors, and controllers reachable. The strongest result is a controlled nighttime effect supported by suitable components, compatible controls, and work performed within the installer’s skills and applicable local requirements.