
How to Attach Christmas Lights to Brick
Compare brick clips, hot glue, and outdoor adhesive clips, with compatibility checks, installation steps, and removal precautions for each method.
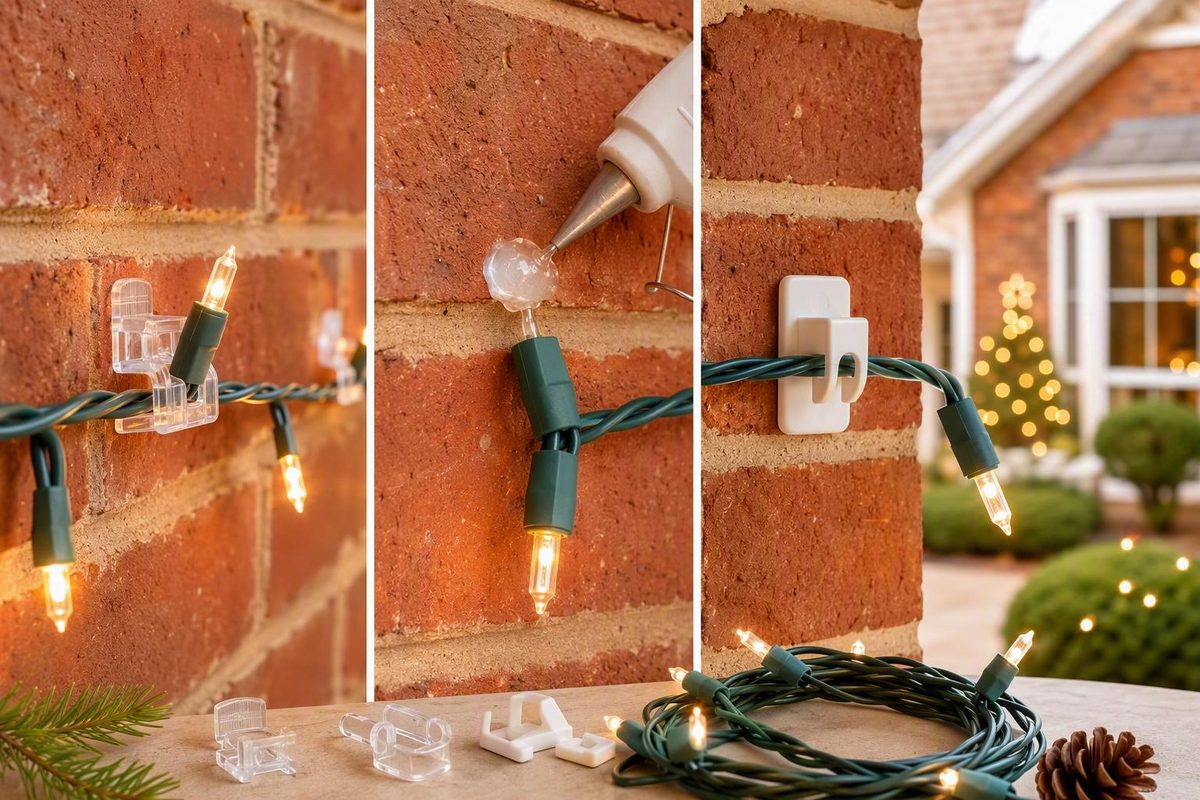
Start with edge-gripping brick clips if the bricks have accessible upper and lower edges and the mortar is recessed enough for the selected clip. If clips do not fit, hot glue is a conditional option for dry, unpainted brick. Outdoor-rated adhesive clips belong only on smooth, clean, dry masonry approved by the clip manufacturer.
For adhesive products, complete the specified bonding or curing period before loading the test attachment. If the masonry or mounting product is incompatible, move the lights to gutters, shingles, trim, or freestanding supports rather than forcing an unreliable attachment.
Quick answer: match the attachment method to the brick
They are not universal: brick height, exposed edges, and mortar recess must match the selected clip.
| Surface condition | Suitable method | Compatibility check | Reason to avoid |
|---|---|---|---|
| Accessible upper and lower brick edges with recessed mortar | Edge-gripping brick clips | Measure brick height and mortar recess against the clip instructions | Flush mortar, rounded edges, or incorrect dimensions can prevent a secure grip |
| Dry, unpainted fired-clay brick | Carefully tested hot glue | Test adhesion and removal in a hidden area | Do not transfer this method to painted brick, stone, stucco, damp masonry, or other cladding |
| Smooth, clean, dry brick or mortar | Outdoor-rated adhesive light clips | Confirm approved surfaces, application temperature, cure time, and load rating | Rough, porous, dirty, damp, cold, or weathered masonry may undermine adhesion |
| Rough or uneven brick that rejects adhesive | Compatible edge-gripping clip or another support location | Check whether the clip can reach sound upper and lower edges | Do not force an adhesive solution onto an unsuitable surface |
| Painted, damp, deteriorated, or highly porous masonry | Gutter, shingle, trim, or freestanding support | Verify that the alternative support and fastener suit the light set | No temporary method can be assumed to hold reliably or remove without marks |
Where possible, support heavier lines from suitable roofline features rather than asking small adhesive mounts on masonry to carry the run.
Whatever method you choose, begin with one inconspicuous attachment. Check a mechanical clip for rocking or poor engagement. For glue or adhesive, wait through the complete specified bonding period before assessing its hold, then stop if it peels, stains, or disturbs the surface.
Check the wall, lights, and layout before mounting anything
First identify the actual cladding. Instructions written for unpainted brick should not be transferred to another material.
Inspect the proposed route closely. Brick clips need sound, accessible edges rather than rounded, chipped, or crumbling faces. Recessed mortar may provide room for a clip; flush or projecting mortar can prevent it from engaging. Do not mount lights to loose or deteriorated brick or mortar.
Read the mounting product’s instructions and check:
- Approved surface type
- Compatible brick dimensions
- Required mortar recess
- Application-temperature range
- Outdoor or weather rating
- Per-clip load rating
- Required surface preparation
- Bonding or curing time
- Removal procedure
Lay out the entire strand while it is unplugged. Identify corners, endpoints, transitions, and places where sockets or decorations add weight. Plan multiple supports so that one attachment does not carry the entire run.
There is no universal clip spacing or load limit for every installation. Follow the ratings for the exact mounting product and light set rather than copying a generic spacing rule.
Leave slight slack between supports. The aim is an orderly run supported without being tensioned like a cable.
Method 1: Install edge-gripping brick clips
This method works only when the clip can reach sound upper and lower brick edges and the mortar is recessed as required. Measure the brick rather than assuming any product labeled “brick clip” will fit.
As one product-specific example, UTR Decorating states that standard DécoBrick hangers fit bricks from 2 1/8 to 2 1/2 inches tall, while its XL model fits bricks up to 3 inches tall. Both require at least 1/4 inch of recessed mortar. These dimensions apply only to those products. The company’s capacity and no-damage statements are manufacturer claims, not independent test findings, as its DécoBrick compatibility and installation guidance makes clear.
- Mark the route. Choose the brick course that will carry the lights and identify corners and endpoints.
- Fit the lower edge. Hook each compatible hanger beneath the lower edge of a sound brick.
- Engage the upper edge. Stretch or fit the hanger over the brick’s upper edge exactly as its instructions specify.
- Add multiple hangers. Distribute them along the run, with additional support where the strand changes direction or carries more weight.
- Place the strand in the hooks. Rest the light-string wire in the hooks as directed, without pinching or sharply bending it.
- Fine-tune the positions. Reposition hangers near lights or other points needing additional support.
Keep the line orderly and slightly taut, but not tight. It needs enough freedom to move without pulling out of the hooks. If a clip rocks, barely catches an edge, or requires enough force to risk chipping the brick, it is not compatible.
Method 2: Use hot glue on dry, unpainted brick
Hot glue is a fallback, not a universal answer. The available procedure applies to dry, unpainted brick and expressly excludes painted brick, stone, stucco, and other siding. It does not establish reliable performance on damp, deteriorated, sealed, or severely weather-exposed masonry.
You will need:
- Christmas lights rated for outdoor use
- A glue gun and compatible glue sticks
- Gloves
- Safe, stable access to the mounting area
Hot glue can burn skin, so wear gloves and handle the gun carefully, following the precautions in Pine Hall Brick’s tested hot-glue procedure.
Test the lights before installation. If the light design permits, temporarily remove fragile bulbs while handling the strand. Keep track of their positions and protect exposed components from dirt and moisture.
Test adhesion and removal on an inconspicuous brick before continuing. If the glue stains the surface, refuses to release, or pulls away loose material, choose another mounting location.
The documented procedure calls for applying roughly a one-inch bead of glue to the exterior side of the molded light base, or a button of glue to its flat underside, and pressing that base against dry brick for at least 20 seconds.
Work along the route while leaving enough slack that the mounted bases position the lights without carrying unnecessary wire tension. Do not let the hot gun tip touch the electrical wire.
Pine Hall Brick describes the method as tolerating ordinary rain and snow but notes that heavy ice may cause problems. Treat that as practical manufacturer guidance, not controlled evidence that hot glue will survive every winter or freeze-thaw cycle.
Method 3: Apply outdoor adhesive clips only to suitable masonry
Adhesive light clips are appropriate only for lightweight strands on smooth, clean, dry brick or mortar when the clip manufacturer approves that surface.
Choose clips specifically rated for outdoor exposure. Follow their exact requirements for cleaning, drying, application temperature, pressure, curing time, and maximum load. Do not substitute an indoor removable hook simply because it sticks initially.
One commercial guide says many outdoor adhesives require the application surface to be above about 50°F and recommends waiting until the next day before loading the clips. These are general guidelines; the temperature and curing instructions printed for your selected product control. See the retailer’s outdoor adhesive light-clip guidance for the underlying commercial recommendation.
Apply the clips during mild, dry conditions:
- Prepare the masonry exactly as directed.
- Allow the surface to dry fully.
- Apply each clip with the specified pressure.
- Wait through the complete bonding period.
- Load the clips gradually while supporting the rest of the strand.
- Add support at corners, endpoints, and changes in direction.
Do not assume that fixed spacing will work for every wall and strand. If a clip peels, rotates, or lifts at the edges, stop rather than adding more load. Rough brick and heavier C7 or C9 lines are better candidates for compatible mechanical clips or another suitable support surface.
Remove the display without pulling on the wiring
Unplug the display first. Support the strand with one hand as you release each attachment with the other. Remove fragile bulbs first when the light design and mounting method make that safer.
For brick clips, reverse the installation process without levering the clip against the brick face. Keep reusable hangers only if they remain undamaged and have not become distorted.
For adhesive clips, follow the manufacturer’s pull-tab instructions. Pull slowly in the specified direction—often parallel to the surface—instead of prying the clip outward against the masonry.
For hot glue, Pine Hall Brick’s procedure suggests applying alcohol with a cotton swab to help release residue. Test alcohol in a hidden area first and confirm that it is compatible with the brick, mortar, sealer, paint, adhesive, and light components.
None of these methods guarantees mark-free removal. Commercial no-damage claims should not be treated as independent verification.
Complete the outdoor electrical and ladder safety check
Use light sets certified for outdoor use and tested by a nationally recognized testing laboratory. Before installation, inspect every strand for cracked sockets, frayed or bare wires, loose connections, damaged plugs, and missing components. Discard damaged sets instead of attempting a temporary patch. The U.S. Consumer Product Safety Commission’s holiday guidance also calls for GFCI protection and identifies falls as a significant decorating hazard.
Use outdoor-rated extension cords free of cuts, fraying, crushed areas, and loose fittings. Seasonal lights and extension cords with inadequate wiring or strain relief can create fire and electric-shock hazards, according to the CPSC’s household electrical-product guidance.
Secure the complete display before energizing it. Keep plugs and connections off the ground, protect them as the light-set manufacturer directs, and connect the display through a GFCI-protected receptacle or suitable portable GFCI.
Stop if you cannot reach the route while maintaining stable contact, or if weather and surface conditions make footing or access unreliable.
Use compatible brick clips first. Reserve hot glue for a tested area of dry, unpainted brick, and use outdoor adhesive clips only on smooth masonry under the product’s stated conditions. If the masonry is deteriorated, the fastener does not fit, the display exceeds its ratings, or the route cannot be reached safely, move the lights to a suitable gutter, shingle, trim, or freestanding support—or obtain appropriate help. Leave slight slack, inspect the lights and cords, and use GFCI protection before switching the display on.